Cheap and practical DIY wake-up light
Published: 12 Jul 2024 | Last edited: 27 Oct 2024
I really dislike waking up in the dark in the winter, because you need to get out of a deeper sleep state when the alarm goes compared to when it is nice and light outside in the morning. So much so that I worked ahead in the spring and summer to solve this problem. In this blog post I will describe how I made a DIY wake-up light.
If you’re completely uninterested in the design process and just want to know how to build one of these things, you can skip ahead to Design.
Why not just buy one?
As the first step of this project I did some background research about existing solutions, and I saw many people complaining about the fact that you can easily just turn around from “traditional” wake-up lights that sit on your bedside, and that some people had actually made it a habit after purchasing one of them.
I read about people that also saw this problem with wake-up lights. Instead of buying one, they solved it in a different way. A promising solution I saw was that they raised a light source up so that it was harder to avoid it, for example by using programmable LED bulbs mounted inside of the room light socket. I looked around for wake-up lights that also found a way to solve this problem, but I could not find such a product.
This combined with the fact that the wake-up lights I found had weak lights and were very gimmicky, with weird features and even requiring smartphone apps for basic functionality, I decided that I needed something else.
Problem definition
The problem definition was as follows:
I need a solution that makes me sleep lighter/wakes me up gently before the alarm goes, because it makes me wake up more refreshed.
I assumed that putting myself in a lighter sleep state in the winter before the alarm went would make me wake up more refreshed, but this assumption was not fully justified.
That’s why I made a quick and crude prototype using a night stand lamp connected to an outlet timer, which made the light abruptly turn on 15 minutes before the alarm went. This while the entire room was darkened by curtains, to simulate waking up in the winter. I used it for about two weeks and I liked it enough, so I decided to go on with the project.
Requirements
Must haves:
- The solution needs to put me in a lighter sleep state or wake me up in a non-startling way.
- The solution needs to put me in a lighter sleep state or wake me up before the alarm goes.
- The solution needs to put me in a lighter sleep state or wake me up, no matter in what way I’m sleeping (for normal sleeping positions of course).
- The solution needs to eventually turn off after the alarm has gone, “eventually” being a user-customizable time.
- It needs to be possible to turn the solution off completely.
- I need to be able to touch the entire outside of the powered solution without any electrocution hazard.
- The solution must be powered primarily via a wired connection. Batteries are optional.
- The solution must not need proprietary software that could get outdated in the future.
- All data acquired by the solution must remain local to the solution.
Nice to haves:
- The solution is cheap.
- The solution is simple, it doesn’t consist of many parts.
- The solution is easy to install/attach.
- The solution lasts a long time without repairs or replacements.
- The solution doubles as a reading light.
- It’s possible to change the settings needed for functionality using only the device itself.
- The solution retains its time settings, even when the power is cut for a long time.
- The alarm only needs to be set in one place: the activation time of the solution doesn’t need to be set separately to the alarm.
As you can see, I initially kept the requirements and therefore the potential solution as broad as possible, instead of only focussing on wake-up lights. Even keeping account with creating my own device from scratch. There was potentially a better solution out there than using a light to wake me up, but that was for me to find out.
Potential solutions
My first idea was to create a custom alarm clock with a microcontroller that had a 230V power outlet to which a normal lamp could be attached, and the device could dim the lamp using PWM based on the set alarm time. I was very excited by this idea, so I started designing immediately, which was way too soon in hindsight. I even bought components before the design was done.
After a while I became intimidated by the complexity, so I took a step back and researched what solutions already existed. The following is what I could find:
- Gradual sound alarm
- Vibrating alarm
- Wake-up light
I really liked the idea of the gradual sound alarm. My phone had a gradual alarm feature, so I started using it as an alarm clock, and this was already an immediate improvement. I threw my heart attack alarm clock in the trash. It wasn’t the full solution though, because this solution was about the alarm itself, not about something that made me sleep lighter so that the alarm didn’t have to do as much work.
I knew that I still needed to have a sound alarm because it’s always a guaranteed wake-up, and I didn’t want to take the risk of using something else, so at this point I considered the alarm itself separate from this project unless I could combine the sound alarm with the solution. In future projects I will make the scope more explicit to avoid late decisions like this.
The vibrating alarm was also interesting. It’s essentially a device that’s against your body, like a phone or smartwatch, which vibrates before you wake up to put you in a lighter sleep state. There are even fancy open-source applications that monitor your sleep cycles and wake you up at the optimal time before the alarm goes, like the following project:
Pretty cool, although it was not for me because I don’t like wearing a smartwatch to bed. It could probably work for someone else though.
The wake-up light remained the best solution for me, so I decided to explore it further.
Wake-up light: what way?
There are many ways to do wake-up lights. Let me list what I could find:
Buying a pre-existing wake-up light
Was immediately eliminated because of the previously listed problems in Why not just buy one?
PWM controlling a 230V outlet and connecting a light
Has the advantages that it’s easy to have a light source that’s raised so that it’s harder to make a habit of avoiding the light, and that you can also use pre-existing lamps.
Has the disadvantages that it requires some specialized components like a 230V PWM module and a microcontroller, and that it’s difficult to find what types of lights and devices would be supported. It could also be complex if you need to use a microcontroller, and the fact that you need to work with 230V makes it a very risky project for someone new to electronics like me.
PWM controlling LEDs with a lower voltage
Has the advantages that it’s a lot less risky than working with 230V itself, and that it does not need as many specialized parts.
Has the disadvantages that the timer + dimmer combination could be tricky to achieve, and that it could be more difficult to drive powerful LEDs with a separate, weaker power supply.
Connecting a light to an outlet timer
Has the advantages that it’s a very simple solution, and that it also worked for the prototype.
Has the disadvantage that the light is very abrupt. Could be solved by attaching a circuit to the timer that gradually increases the light when power is applied, or choosing a lamp that takes a while to get to full power. The problem with these workarounds is that it’s not (easily) possible to customize the time the light takes to get to full brightness. See the following links:
- https://www.instructables.com/Sunrise-Alarm-Clock-1/
- https://www.reddit.com/r/DIY/comments/2zyjaz/simple_cheap_sunrisedawn_simulator_gradual_wakeup/
Using a programmable light bulb
Has the advantages that it’s simple, cheap and has enough power. Can be screwed into a room or night stand light socket to provide light from above.
Has the disadvantages that it needs to be programmed remotely, and often using proprietary apps. Although proprietary apps could maybe be avoided.
The choice
I chose to explore controlling LEDs with a smaller voltage using PWM first, as it had the greatest chance of fulfilling most of the requirements, and it didn’t seem to have any too problematic disadvantages at first sight.
The biggest problem was that I needed the combination of a timer and a dimmer for a specific voltage, and I didn’t know of such a thing existing. The only way I knew how to do this was by using a microcontroller with a PWM module, and I didn’t like the complexity of that. Especially if I was to add all the buttons to program it.
So I started searching for “LED timer dimmer” and related. Lo and behold, after a while I found something great. Apparently, aquariums require a very similar thing. It’s literally called an “aquarium timer dimmer”, and it can dim aquarium lights to specific strengths at specific times of the day. It was perfect for this use case.
In hindsight one of the links during research also discussed using an aquarium dimmer for a wake-up light, but I missed it, which meant I had to rediscover this solution myself.
Trying it out 💡
I looked for a cheap timer dimmer that could automatically and gradually dim lights in steps between user set times, and I found a very nice one that had 100 dimming steps and 8 programmable times, and which had a display that was not too bright to be close to my bed. This was the S2 Pro, available on AliExpress for about €15,-.
This device can power LEDs between 12-36V, with a maximum of 100W. It has a male (for the light) and a female (for the power supply) 5.5x2.1mm DC connector.
I looked around if I had a suitable power supply laying around somewhere, and I could find a 24V 0.5A power supply somewhere in a closet, which I decided to use. It had a 5.5x2.5mm DC connector, so I made it compatible with the dimmer by soldering a 5.5x2.1mm DC connector to it. An adapter could also have worked, but I liked having it be more permanent.
The light itself was the last choice, and I decided to go for an aquarium light that I would mount to the wall, as the timer dimmer was made for aquarium lights. The light was the cheapest one I could find, not necessarily marketed as dimmable. My impression was that I could just power the light via the power supply and dim it anyway.

The used aquarium light.
So I ordered everything, and after about a week it all arrived. I cut the cables of the aquarium light and measured the voltage at the power supply end. It was 123V, which was completely not what I expected. I knew the wattage of the light, so I tried powering the light using the power supply, but the light didn’t work.
I was very surprised and researched how LED circuits work, and then I found out that LEDs have a so-called forward voltage, which means the voltage over a LED drops by a certain amount when powering it. This means you can only have so many LEDs in series with a specific power supply before the voltage drops too low, and supplying 24V in a circuit designed for 123V would just not cut it. Oh well.
So I had to find a different light, and I had the idea to just use a LED strip, as I now had a better idea of how LEDs needed to be powered. It made a lot more sense to me why the range of the timer dimmer was between 12-36V. Back on AliExpress I went, and I looked for a LED strip that used the maximum power that I could provide with my 12W power supply.
I discovered COB lights, which can produce more light compared to normal LED strips because it has denser LEDs, and this was what I was looking for. This came with the disadvantage that the strip takes more power per meter, but that was fine for me as light intensity was the most important requirement.
I chose one that used 24V to match my power supply, and which had the highest LED density. This was 528 LEDs/m. I used the W/m (watts per meter) number on the product page to calculate what the maximum length of the strip was that I could power with my power supply, and this was 0.5m, which was completely fine for my use case. So I ordered a 0.5m strip.
The one I ordered had a natural white color instead of a more yellowish hue. I haven’t verified it, but I believe this choice makes sense for wake-up lights. But it doesn’t matter that much anyway.
After it arrived I tested it, and the light worked great with the timer dimmer, so I’m very happy with it. I installed it on the wall at the head side so that the light would shine down on every side of the bed and I could not avoid it. Both the S2 Pro and the LED strip could be glued to the wall, as the S2 Pro came with a glue pad. This is how the whole setup looks:
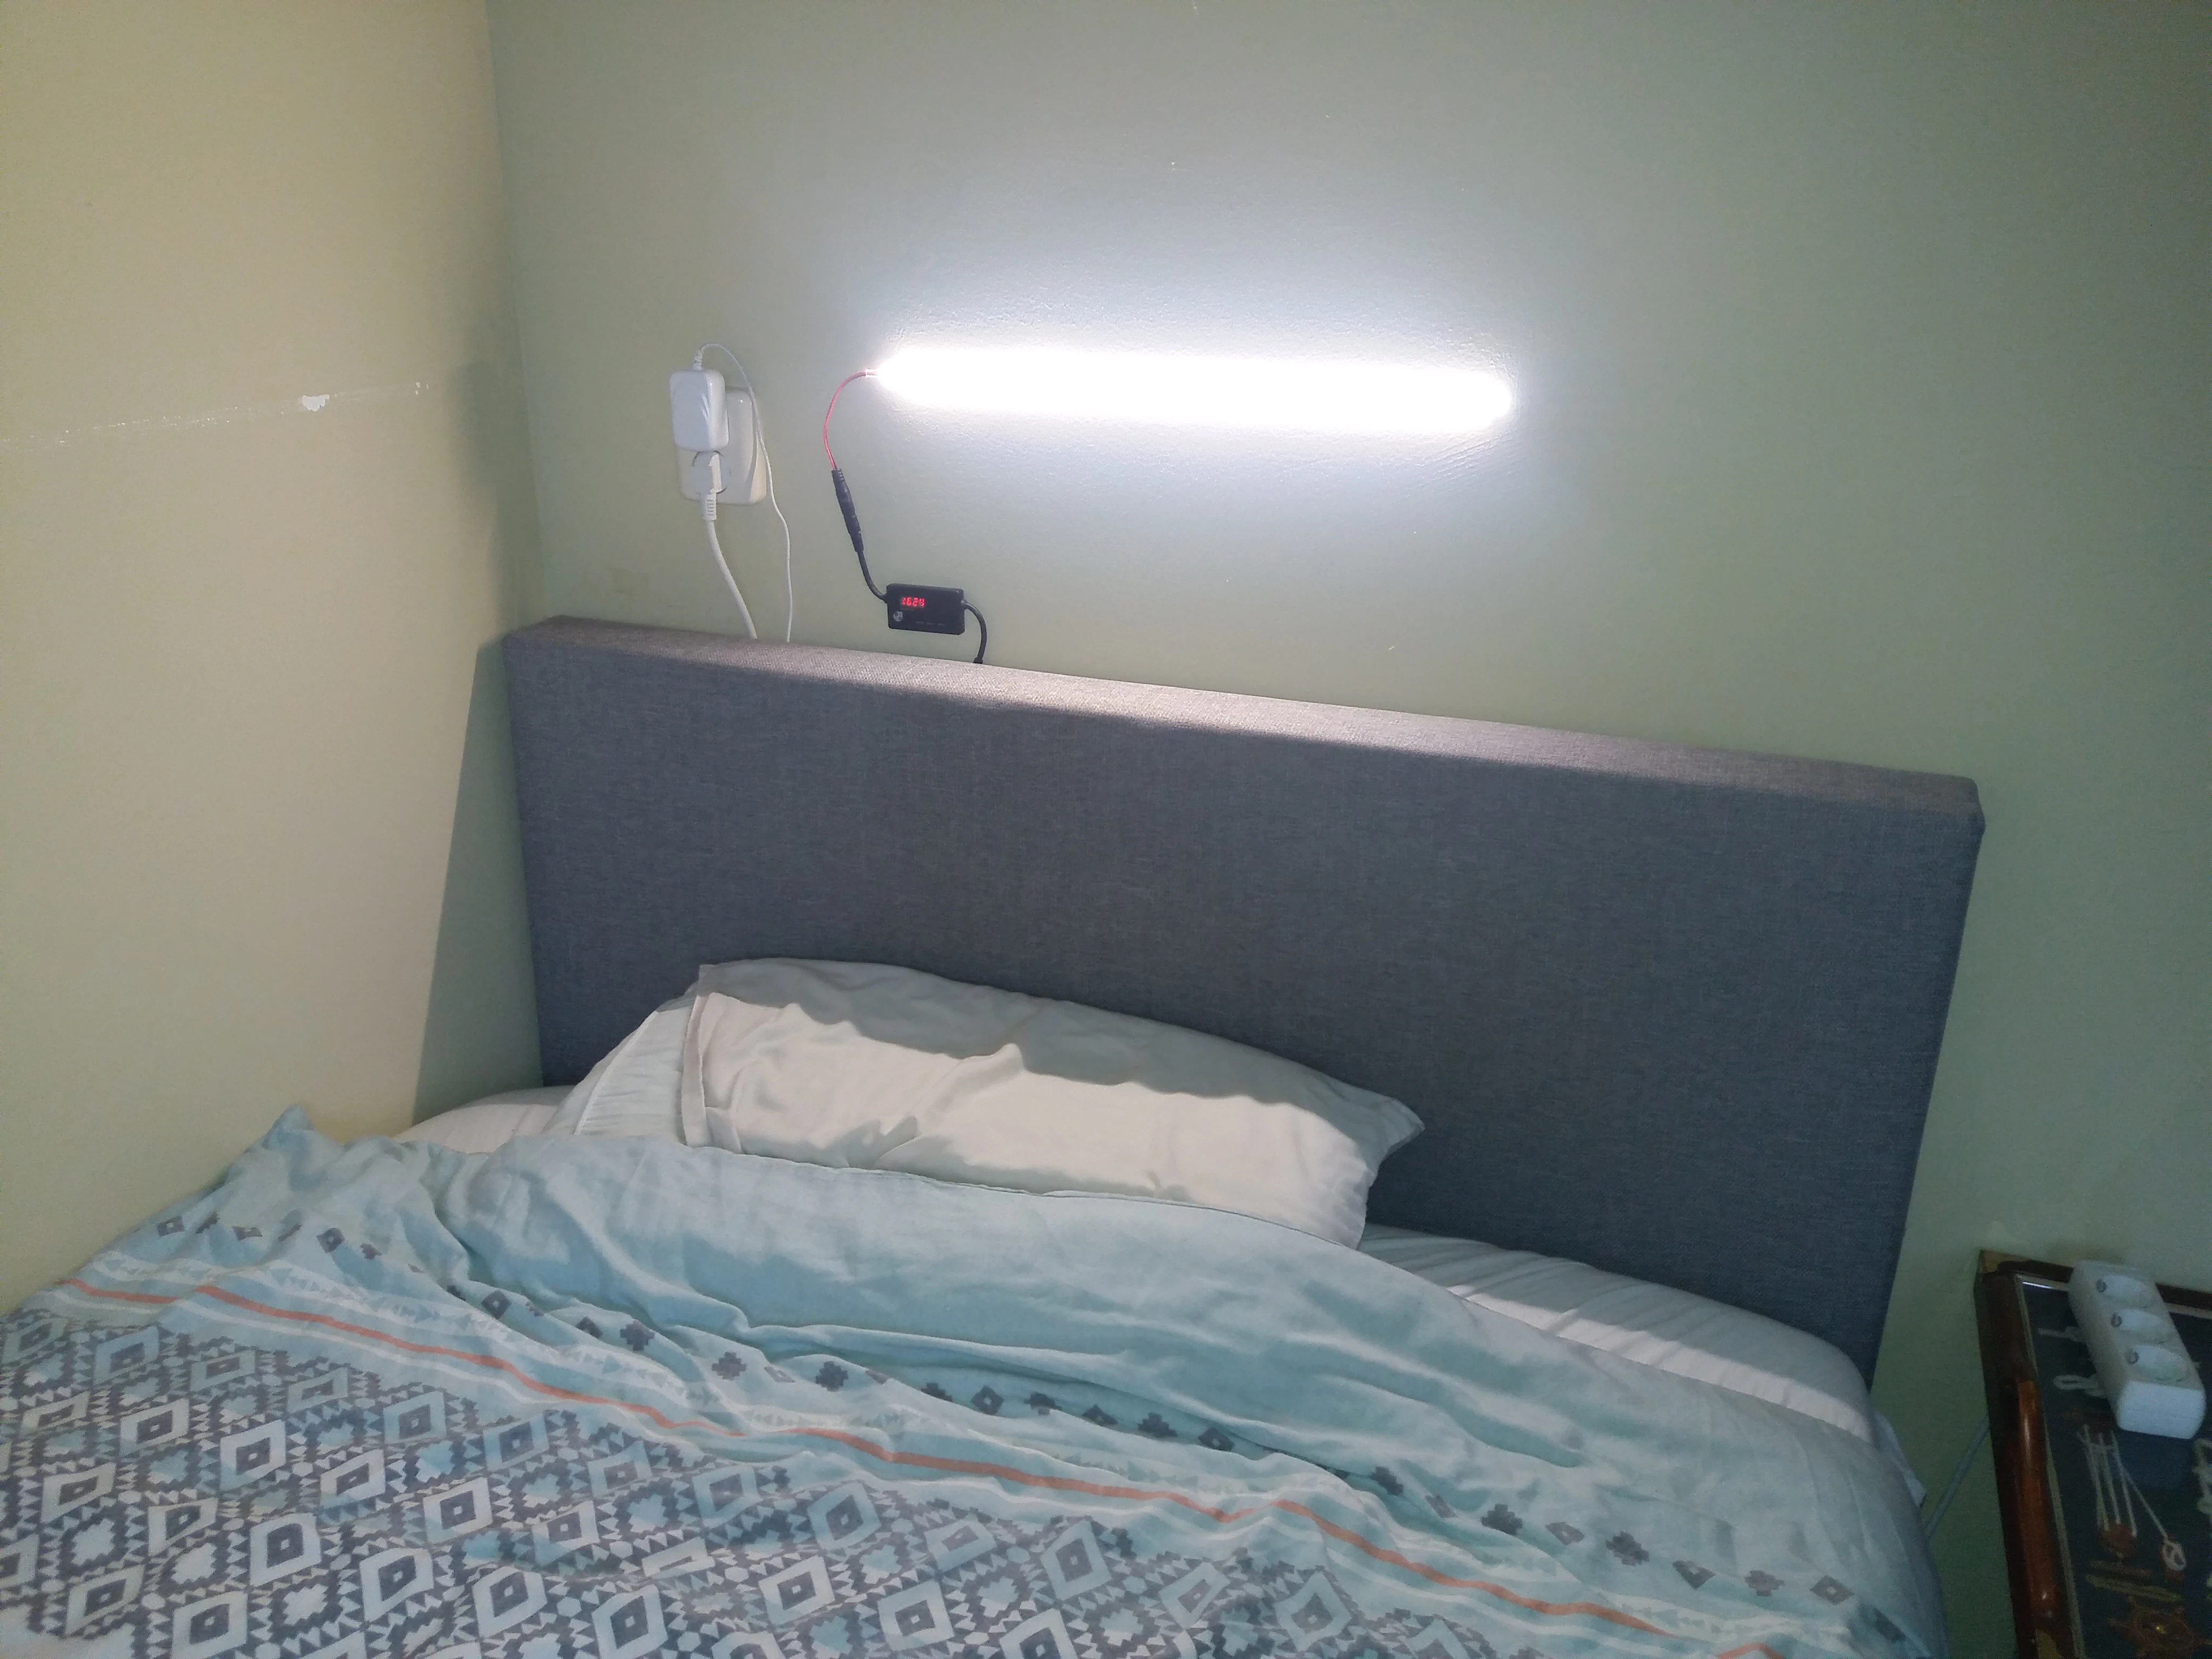
The end result, nice and bright. Just ignore the paint I ripped off by installing the LED strip in the wrong place the first time.
There was about €50,- spent in total, but this includes all the wrong purchases. I’m pretty happy with this amount, especially considering this is about the same as a normal wake-up light, and this one fits my requirements a lot better.
All components together, if not purchasing wrong things, costs about €25,- with my configuration.
Design
Here I will condense everything down into a design for people that want to build their own setup. The finished result looks like this.
First, choose your timer dimmer. I chose the S2 Pro aquarium timer dimmer. It has a 5.5x2.1mm DC female input (for the power supply) and male output (for the light), and it can dim 12-36V lights using PWM, with a maximum of 100W. It has 8 programmable times and 100 dimming steps. You can swap this with another timer dimmer if you make sure that it works with your power supply and lights.
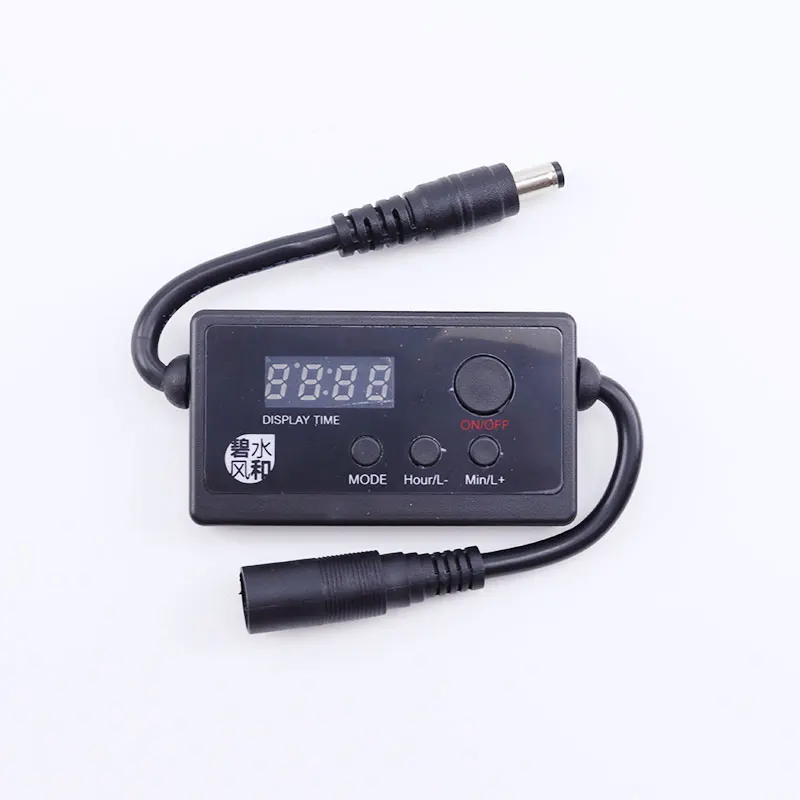
The S2 Pro timer dimmer, which I used.
Secondly, choose a suitable light. Make sure that the light needs between 12-36V, and that the light doesn’t use more than 100W (assuming you’re using the S2 Pro timer dimmer). If you can, choose the lowest voltage light possible in this range. This doesn’t have an effect on the length of the light, but it does help to cut down the costs of the power supply.
The light needs to be dimmable by PWM, so the best choice is LED lighting. Also make sure that it has a 5.5x2.1mm female DC connector. Another option is to buy a 5.5x2.1mm DC female adapter that fits into the connector of the light.
Try to find a light that is strong enough. I chose a 24V (Only because I had a 24V power supply laying around) 0.5m COB LED strip with 528 LEDs/m (high LED density for a stronger light) that takes 14W/m (watts per meter) and has a natural white color, but you are free in all these choices.
Thirdly, find a suitable DC power supply. Choose a power supply with the same voltage as the light, and which has a 5.5x2.1mm male connector. You could also use an adapter if the plug size is different. Make sure the power supply can provide the amperage needed for the light.
To find the amperage needed for the light, first divide the W/m number of the light by the length of the light. In my case this was 14W/m / 0.5m = 7W. Skip this step if not using something like a LED strip that has a variable length, in that case just use the wattage of the light in the next step.
So I needed 7W in total to drive the light. To find the amperage needed, I had to divide this wattage by the voltage of the light/power supply. This was 7W / 24V = 0.29A.
In my case I needed a 24V power supply that could provide at least 0.29A.
As a last step, connect everything together, check if it works, and program the timer dimmer. You can find instructions on how to program the S2 Pro in the box and online.
The total costs with my configuration were about €25,-. Everything in my configuration was available on AliExpress.
You can manually turn the S2 Pro on to use it as a reading light, and you can specify its strength when it is manually turned on. You can also turn it off completely.
For using it as a wake-up light, when it is enabled and in automatic mode, you can program its current time, the time that it starts becoming brighter from zero brightness, the time that the light is fully on (normally the time that the alarm goes) and how bright fully on should be, how long it should stay at this brightness, and when the light should turn off again. This cycle will then happen every day like a normal timer.
In theory you can program 8 times + brightnesses in any way, if you need to. The S2 Pro will gradually change the dimming of the light between the set times, which is very nice. It also retains its settings on power loss.